Showing posts with label crumbly and sandy. Show all posts

Saturday, October 5, 2013

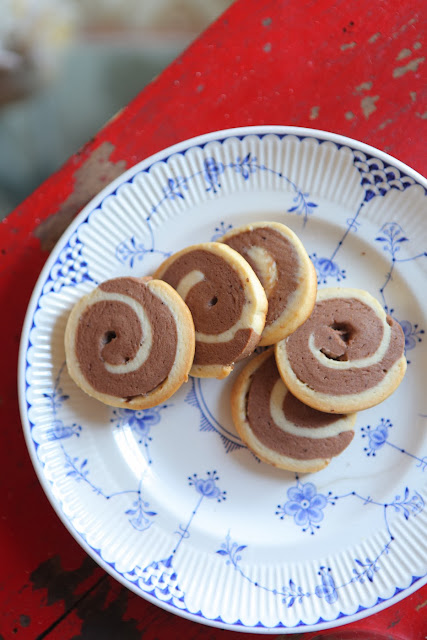
[Cookie 103] Icebox Spirals and Bull's-Eyes


God this feels so WEEEEIRD!!!!!!! I can't believe I'm doing this again.  What's wrong with me?! Everything has changed since I left the blogging world.  Google Reader doesn't even exist anymore, so how will people even know about this blog? Actually, if there's anyone out there reading this, would you mind giving me some insight into how people/you read blogs these days? Like, how are you reading this right now? I know all about Pinterest and Instagram (follow meee), but what about BLOGSSSSS?? Are they, like, so 2010? Help!

Okay, so let's get to know each other again, yeah? Since I last posted, I have graduated college, moved into a really awesome apartment, traveled around India for 4 months, been using a laptop with a non-functioning period key for nearly a year, and finally got a legit job at a photo company.  This is the lady who is writing to you:


And here are some nice things she has in her apartment (Baryshnikov and Dahlias, both are sexy):


She has NOT been baking very much, that's for damn sure.  Until now--I am so ready to do this.  I hate the fact that my triumphant return is marked by such a pathetic, boring, lame cookie, but hey, I'm still the same girl who wants to bake cookies without having to go food shopping for any ingredients other than sugar and butter.  So I made these guys.  But don't worry--I've pretty much exhausted all the really boring recipes from the book, so now I have no choice but to buy expensive, weird ingredients and bake difficult, tedious recipes!


Anyways, let's get to it.  This is a total standard icebox cookie recipe, so you can make the dough and keep it in the freezer for a century and bake a random cookie here and there when you feel like it.  The only way I can see Martha justifying including this boring recipe in her book is because she made fucking spirals with the dough, but seriously Martha, we all know you're really good at making boring shit look pretty.  Come on! A little flavor would have been nice.  Also, these were totally NOT crumbly and sandy! That may have been my fault, but still, I'm upset.


So I tried to spice it up by using Droste cocoa and this fancy vanilla extract, but it really didn't make much of a difference.

And I didn't even TRY to make the bull's-eyes, because those look so LAME!!!! Like, who cares about those guys when you've got spirals around.


In summation, this recipe is in no way remotely worth the effort of rolling the dough into a pretty spiral log.  The cookie is nice only if you've just discovered that you had already made the dough several years ago and it's been sleeping in your freezer collecting freezer burn and now you can have surprise cookies! I would not bake them if you want cookies right now--maybe bake them in preparation for nuclear apocalypse? Otherwise, choose from any of the other delicious, simple, fast recipes in the book.


Icebox Spirals and Bull's-Eyes
Makes 34 bull's-eyes and 28 spirals

Ingredients


  • 1 1/2 cups (3 sticks) butter
  • 1 3/4 cups sugar
  • 1 teaspoon salt
  • 2 eggs, plus an extra egg white for "glue"
  • 3 teaspoons pure vanilla extract
  • 5 cups flour, plus more for work surface
  • 2/3 cup milk
  • 1/4 cup cocoa powder

Directions
    1. Using the electric mixer, mix the butter and the sugar until creamy. Add the eggs and the salt, and mix well. Beat in milk and vanilla. Add flour a little at a time, mixing it in until all of it has been incorporated.
    2. Divide the dough into balls, one for each color. For chocolate dough, add cocoa (1/4 cup is enough to flavor half a batch). Mix well with electric mixer. For colored dough, start with 1/4 teaspoon food coloring, and mix well. Add more in tiny amounts for darker colors. Gel-paste coloring can be intense, so add it gradually.
    3. Wrap each ball of dough in its own sheet of plastic wrap; pat flat into a rectangle. Refrigerate at least one hour or until ready to use.
    4. Parchment or waxed paper makes a good work surface. Sprinkle generously with flour, then roll out each piece of dough 1/4 to 1/2 inch thick to make the swirls; you can use thicker layers for the bull's-eyes.
    5. The bench scraper is a good tool for trimming dough's edges to make them even. The egg white, brushed on with a pastry brush, will act as a glue, making the layers stick together.
    6. For center, with your hands, roll chocolate dough into a 1/2- to 1 1/2- inch-thick rod; chill 20 minutes. Place rod on edge of rolled-out dough that's been brushed with egg white.
    7. Roll rod inside sheet of dough. Cut the dough where it meets up. Seal by pinching and pressing gently. Chill 20 minutes, then repeat to add other layers. To decorate, go to step 7, or jump to step 8 for plain.
    8. For spirals, measure and trim two or more colors of dough to same size. Brush on egg white, then stack layers. Brush top with egg white. Starting at one end, roll up the dough.
    9. Smooth and straighten the layers as you roll them so there are no gaps, then gently pinch and press the edge of the roll to seal it. Now the dough is ready to decorate. If you want plain cookies, skip to step 18.
    10. Add your favorite toppings (try coconut, colored sanding sugar, chopped nuts, or chocolate sprinkles): Spread topping in baking sheet, brush dough with egg white, and roll the log in topping.
    11. Roll each log in parchment or waxed paper; twist the ends of the paper closed. To help the logs keep their round shape, set each in a cardboard paper-towel roll that you have sliced open lengthwise.
    12. To remember what colors you have already used, with crayons, draw the designs onto key tags; tie the tags onto the paper covering the logs. Chill logs until they are solid, about 1 1/2 hours.
    13. Cut 15 inches of dental floss (or double thickness of thread). Let log soften for about 10 minutes. Remove parchment. Wrap floss around log and pull through. Make the slices thin: 1/4 inch or less.
    14. Preheat oven to 350 degrees. Place slices on an ungreased baking sheet (lined with parchment paper). A grown-up should bake the cookies 12 to 15 minutes, until firm but not browned. Let cool on baking sheet for several minutes, then transfer to a wire rack.
****
{End Results}
Baking Difficulty: 2/5
Ingredient Accessibility: 5/5
Tastiness: 2/5
Attractiveness: 3/5
Is it worth it?: Nah

{Pairings}
Drink: Margarita
Activity: Celebrating my return with listening to the above song

Thursday, January 27, 2011

[Cookie 097] Cream Cheese-Lemon Bows


DSC_0191

THERE IS SO MUCH GODDAMN SNOW EVERYWHERE I CAN'T BELIEVE IT! Oh my God!! The Mayans were right--they are sending us signals by burying the entirety of New York City under 85 feet of snow. I walked home last night, late, and there was so much snow I couldn't actually see any of the cars parked on the streets, and couldn't see where the sidewalks ended and the streets began! White blanket of snow everywhere, nothing is spared! Armageddon is here! It's all going to be over by 2012! But at least school was cancelled today :)

Screen shot 2011-01-27 at 4.42.17 PM
Thanks, New York Times, for capturing our misery.

During trying times like these, I like to hark back to the days of yore, when I was passing my winter days in 70-80º weather in the land of Southern California. Those times were easy, carefree, and the sun was always kind to us. I never wore more than 1 sweater at a time and didn't fall down on my ass nearly as much. And during those warm winter days, we reaped the benefits of having a Meyer Lemon tree that produced such an excessive number of lemons that we didn't even know what to do with them all. And the thought of making lemon sorbet wasn't appalling, but enticing!

DSC_0144
DSC_0128

So, those pictures are half of the total number of lemons we harvested from our 1 solitary tree a few weeks ago. As you can see, we had quite a number of these citrus fruits. So, obviously I cracked open The Book and looked up all the lemon cookie recipes I had yet to make: Cream Cheese-Lemon Bows. Unfortunately, the recipe only calls for about 1 lemon, so that really didn't make much of a dent in our supply, but you do what you can! You juice the rest and make lemon juice ice cubes, and you peel the skin and freeze that too so you have lemon zest ready 2 go year round! Harvest the harvest forever!

DSC_0159

But back to the cookies. These were really tasty! I have really come to love cream cheese based cookies because it gives the dough a little bit of a tangy bite, as well as a creamy buttery taste. And then with the lemon juice you get a really wonderful flavor, something a little out of the ordinary and just plain delicious. Piping the dough into bows can be a little bit of a pain in the ass, and most of mine ended up looking pretty shitty, but the ones that work out are indeed quite adorable. You could just as easily use a big fluted piping tip and make flower dots or whatever else you can manage. (Or use one of these? Never tried one, but maybe this would be a good recipe to try with one...)

DSC_0126
DSC_0150

So, being that it is winter and therefore A) lemon season, and B) cold and snowy outside, you really have no excuse not to make these. I want one right now. I want you to make some for me, because I'm too lazy to get out of my snuggie and go into the kitchen and bake something. Thankz.

DSC_0192

Cream Cheese-Lemon Bows

Ingredients

  • 1 cup unsalted butter (2 sticks), softened
  • 3 ounces cream cheese, room temperature
  • 1 cup granulated sugar
  • 1 large egg
  • 2 teaspoons lemon zest, finely chopped
  • 2 tablespoons fresh lemon juice
  • 3 cups all-purpose flour, sifted
  • 1 teaspoon baking powder
  • 3/4 teaspoon coarse salt
  • Confectioners' sugar, for sprinkling

  • Directions

  • Put butter and cream cheese in the bowl of an electric mixer fitted with the paddle attachment; mix on medium speed until creamy. Mix in granulated sugar. Add egg, lemon zest, and lemon juice; mix well. Sift together flour, baking powder, and salt into a medium bowl; mix into butter mixture on low speed.
  • Preheat oven to 375 degrees. Place a small amount of the dough in a pastry bag fitted with a large French tip (such as Ateco #865). Holding tip very close to the surface, pipe 3 1/2-inch bows onto baking sheets lined with parchment paper; space 1 inch apart. Refill pastry bag as needed with remaining dough. Bake cookies until golden brown on bottom, about 12 minutes. Let cool on sheets on wire racks, and sprinkle with confectioners' sugar. Cookies can be stored in airtight containers at room temperature up to 3 days.

  • ****
    {End Results}
    Baking Difficultly: 3/5 (Making the dough is simple, it's just the pastry bag part that's a little tricky)
    Ingredient Accessibility: 4/5 (Right, and if you have a lemon tree, this would be a 5/5)
    Tastiness: 4.5/5
    Attractiveness: 4.5/5
    Is it worth it?: Definitely. Even if you don't do the bows, they just taste really yummy.

    {Pairings}
    Drink: I think a hot toddy would go well with this, but then again I'm just trying to find any excuse to have one of those.
    Song: Lemonworld -- The National
    Activity: Shoveling your car out from under 30 tons of snow! Yay!

    Sunday, December 19, 2010

    [Cookie 093] Italian Polenta Cookies

    DSC_0066

    JUST IN TIME FOR HOLIDAY COOKIE CRUNCH TIME......I AM BACK!!!! Sound the airhorns, stop the presses, release the carrier pigeons, send the fair eyed virgins a-dancing! This boat is real!

    DSC_0070

    Seriously now, how has it been so long? Oh yeah, I remember now: I was in Ghana with a gas stove which had no temperature gauge, could only be set to "inferno" (...more commonly known as "broil" I think), no measuring spoons, no chocolate that costed less than 1 arm and 1 leg, and oh yeah, baking in 90º+ weather...yeah right. But now I'm sitting in my cozy new apartment in Brooklyn and it is cold cold cold! And I've already baked up a new batch of cookies to cut the ribbon, so to speak, of my new life in BK. (Did I mention I live above a Polish Bakery?!)

    DSC_0014DSC_0077DSC_0078
    Some shots of my new place! Kitchen, fridge, window to the fire escape.

    Yeah, lot's to say in this post, that's for sure! I am just so glad to be back in America, and able to cuddle up with my roommates, make hot tea, watch 30 Rock and Arrested Development, and celebrate my 21st birthday by drinking some hot, boozy apple cider. It's so great. Oh, but you're here to get a cookie recipe right? You're in dire need of a new recipe for that cookie exchange right? Or something new and special to bring to that nondenominational holiday party at your workplace right?

    DSC_0016

    Well, this recipe might be it. I say "might" only because I found the cookies to be only so-so. But they are still really tasty and definitely unusual; plus, when you tell people they have polenta in them, they'll think you're such a hotsy totsy food snob, which is always a good thing!

    DSC_0019

    I was technically supposed to make these cookies LAST YEAR for my good friend/roommate/"I-only-eat-Italian-food" Long Islander, but I failed her. And she never let me live it down, until two days ago when I made them. Unfortunately, they didn't look remotely like the photos in the book because a) I used whole wheat flour which gave the dough that lovely beige/sand color (yuck), and b) the dough was way too dry and crumbly for me to squeeze it out of a pastry tube into cute little S shapes. I have no clue why this happened, and I really should have just added more liquid to thedough, but I'm a moron, so I just decided to make drop cookies. The result: THE UGLIEST COOKIES I HAVE EVER MADE, EVER!

    DSC_0020

    Plus, they tasted a tad bland, so we decided to dip them in chocolate. This did not help their looks, but did make them taste real nice. But the chocolate isn't 100% necessary if you intend to eat the cookies a day or two after you make them, because they do taste better with a little bit of aging. Also, I would recommend using a high quality chocolate if you take that route, because Toll House chocolate morsels are pure shit.

    DSC_0076

    But hey! What's with all this negativity? What I liked about this recipe was the inclusion of a hefty amount of lemon zest, which you could actually taste. Plus, polenta (I used cornmeal, same diff) is a great texture for a cookie, and definitely different than your usual Christmas gingerbread/peppermint/who-cares cookies. Seriously, no one wants to eat another gingerbread snowflake, OKAY? Well, I'd eat it, but that's because I have to eat at least one of every edible thing within my sight.

    DSC_0065

    So, now that I'm back fer reeeeal, get ready for major cookie updates. I miss baking so so so0o0o0o0o0o much and cannot wait to really dig my teeth in and bake up a storm. Storm o' flour and butter, watch out! This is only the beginning. I have 1 month and 5 days until classes start, so I'm goin' crazy. Get ready. To get fat. j/k!!!!!!!!!!!!!!!

    xoxo--missed you all, fair readers. (thanks for the emails by the way, they light up my day!)

    DSC_0062

    Italian Polenta Cookies
    Makes about 2 1/2 dozen

    Ingredients

  • 1 3/4 cups all-purpose flour
  • 1 cup Italian polenta, or yellow cornmeal
  • 1/2 teaspoon salt
  • 1 cup (2 sticks) unsalted butter, softened
  • 2/3 cup sugar
  • 1 tablespoon lemon zest, (1 lemon)
  • 1 large egg, plus 1 large egg yolk
  • 1 teaspoon pure vanilla extract

  • Directions

  • Preheat oven to 350 degrees. Whisk together flour, polenta, and salt in a medium bowl; set aside. Put butter, sugar, and lemon zest in the bowl of an electric mixer fitted with the paddle attachment; beat on medium-high speed until pale and fluffy, about 2 minutes, scraping down the sides of the bowl as needed.
  • Add egg and egg yolk, one at a time, beating after each addition to combine. Mix in vanilla. Gradually add flour mixture, and beat until just combined. Transfer batter to a pastry bag fitted with a 1/2-inch star tip (such as Ateco No. 826).
  • Pipe S shapes about 3 inches long and 1 inch wide, spaced 1 1/2 inches apart on baking sheets lined with parchment. Bake cookies until edges are golden, 15 to 18 minutes. Transfer cookies on parchment to wire racks; let cool about 10 minutes. Remove cookies from parchment, and transfer to racks to cool completely.

  • ****
    {End Results}
    Baking Difficultly: 2/5
    Ingredient Accessibility: 3.5/5
    Tastiness: 3/5
    Attractiveness: 1/5
    Is it worth it?: Yeah, I guess so.

    {Pairings}
    Drink: A 7-and-7. Don't ask why.
    Song: An oldy, but goody!!!!!!!!
    Activity: LOVING AMER-CUH!!

    Monday, August 23, 2010

    [Cookie 088] Wholemeal Almond Biscuits

    DSC_0017

    HELLO! Wo ho te sen? I am writing from Accra, Ghana right this instant! I can't believe I've only been here 1 week, because it feels like 1 month. The past week was more than hectic, being that it was orientation week, so we didn't have a moment to breathe. I've gone to lectures, learned a little bit of Twi (the language spoken here), gone shopping (I've only just begun...), watched some traditional African drumming and dancing, went to an afrobeat concert, went to the beach, seen the local universities, and just had my first class (African Philosophical Thought) today. It's hot and humid, but not too bad. And the food...

    The food.

    Is so.

    Good.

    I think I can get used to this. Jollof rice, yum yum, banku, yum yum, fufu (haven't had it yet, but I can't wait), and plantains!! And get this: they sell shots of alcohol in packets like ketchup. Uh, yes. I got some/a lot. Cane Spirit! Coffee-flavored Whiskey! Gin! Haven't tried that coffee or cane stuff yet, but you just wait. I'll report back. Oh, and listen to this great idea that one of my esteemed colleagues came up with: buy a coconut on the street, pour a packet of gin into the coconut water, and then stick in a straw and DONE. After-school special. Ah, yes, I could so get used to this.

    DSC_0016
    DSC_0015

    One thing that will make this whole blog thing a little difficult is the fact that the internet connection here is hardly adequate. Whatever--I'll do something else, like READ. Whoa. Or maybe draw. I think it will be good for me, build character. I'm too dependent on this computer here. Maybe I'll start basket weaving, which I'm going to be learning in one of my art classes (!!!!).

    DSC_0066

    This huge culture shock and overwhelming week of change makes writing this post a little weird. Thinking about these cookies, and what I was doing during the time I made them, seems like eons (and miles) ago. I'd usually try to make my initial anecdote somehow relate to the cookie in question, but I don't think I can do it this time. These Wholemeal Almond Biscuits just don't scream Ghana at all. Well, they are sort of like Hobnobs, which are these amazing cookies that probably aren't from Ghana only, but still--SO good. But more than that, to me they scream English tea time, so maybe you could make the whole British colonization connection, but I really don't feel like getting into that....at all.

    DSC_0027

    So let's just talk straight about these cookies. They are very subtle in flavor, not sweet at all really. They do have a really nice cinnamon undertone, though, along with the flavor of almonds and whole wheat flavor, which I really loved. Their name is a really accurate description of what kind of cookie you get--a biscuit, wheaty and nutty. They are hearty and great with tea, or maybe with a bit of whipped cream/clotted cream and some berries for a fancy tea-time treat.

    DSC_0205
    DSC_0206
    DSC_0210

    Once again, the recipe has you make your own almond meal, and this time I actually did that instead of substituting store bought almond meal. Good choice! The recipe worked perfectly and the toasted almonds gave a great flavor to the dough. If you want, you could probably add nutmeg or some other spice, but I thought the cinnamon was just perfect.

    DSC_0200
    DSC_0214
    DSC_0219

    Okay, so a great tea cookie. I think I can make a feeble connection to Ghana with this one: THEY DON'T DRINK REAL COFFEE HERE. Or at least, I've had trouble ordering anything other than Nescafe instant coffee. This makes me majorly sad. I bought some ground coffee that's made in Togo, which is awesome in theory, but doesn't taste really that great. But I'm a bit of a snob about coffee, so don't listen to me.

    DSC_0051

    Aaanyway, I think that's all I've got to say about these. You should make them. Serve them with iced tea, since it's way too hot to think about boiling water in the northern hemisphere. Or hey, you could maybe make ice cream sandwiches with these--might get a bit messy though.

    DSC_0097DSC_0059

    I actually ate mine with a cup of Tazo Honeybush tea and a small cup of cold Tapioca pudding that my dad made the night before, and it was a perfect afternoon dessert (new meal! new meal!). The tapioca might have been a little heavy to have with an already heavy cookie, but the Honeybush tea was just right--nice and light, but with a strong enough floral flavor to really be quite refreshing.

    DSC_0109

    Okay, I'm going to go now. I have class soon. Aight. Bye bye. Until next time (soon I hope!)

    DSC_0063

    Wholemeal Almond Biscuits

    Ingredients

  • 1 cup blanched whole almonds, toasted
  • 3/4 cup whole wheat flour
  • 1/2 cup all-purpose flour, plus more for work surface
  • 1/3 cup packed light-brown sugar
  • 1/2 teaspoon coarse salt
  • 1/4 teaspoon ground cinnamon
  • 1/2 cup (1 stick) unsalted butter, cold, cut into pieces
  • 2 tablespoons ice water, plus more if needed

  • Directions

  • Pulse almonds in a food processor until coarsely ground. Add flours, sugar, salt, and cinnamon, and pulse to combine. Add butter, and pulse until mixture resembles coarse meal. With machine running, pour in enough water until dough just starts to come together on the sides of the bowl. Shape dough into a ball, and wrap in plastic. Refrigerate until cold and slightly firm, no longer than 30 minutes.
  • Preheat oven to 350 degrees. Roll out dough on a lightly floured work surface to an 11-inch round just more than 1/4 inch thick. Cut out 3-inch circles. Carefully gather scraps of dough, reroll, and cut out remaining biscuits. Space 1 1/2 inches apart on baking sheets lined with parchment paper. Bake cookies until edges are golden brown, about 30 minutes. Let cool on baking sheets on wire racks. Cookies can be stored in an airtight container at room temperature up to 5 days.


  • ****
    {End Results}
    Baking Difficultly: 2/5
    Ingredient Accessibility: 4/5
    Tastiness: 4/5
    Attractiveness: 3/5
    Is it worth it?: Yes!

    {Pairings}
    Drink: Tazo Honeybush tea, or any other Rooibos/Redbush tea
    Song: That's Where It's At -- Sam Cookie (!)
    Activity: Afternoon tea, whatever country you live in. I think that activity should really transcend geography and country borders. Teatime for all!

    Monday, July 19, 2010

    [Cookie 083] Maple-Pecan Shortbread

    DSC_0252

    Stroke of genius. How did I not think of this before. Oh man oh man.

    Okay, let me back up. Backstory first. Well, there's no really backstory per se, but more of a source of inspiration. Barbecues; grills; charcoal. Fire! This is how we cook foods during the hottest days of the summer in order to avoid heating up our kitchen to hellish temperatures, right? Oven-roasting is out, as is loading up all 4 burners with huge pots of boiling water and simmering stews, and obviously baking seems completely out of the question. Thus the spareness of posts on this blog (or at least, that's the excuse du jour). So how to get around this issue without confining all baking to the wee hours of the night, if we are to do it at all?

    014_12

    Here's my great, albeit hair-brained, idea: BBQ'd cookies!!!!!!!!

    Okay, okay, I can feel your collective eye-rolling coming at me from all over cyberspace--it sounds ridiculous, but hear me out. You make sure to make a cookie dough that doesn't spread hardly at all, so as to avoid it dripping in between the grill bars. And the dough will have nuts it in, because fire roasted nuts are next to godliness. And then, once grilled, you serve these cookies with grilled fruits (grilled peaches anyone??). Dollop with ice cream. Dessert. Done.

    DSC_0263

    Alright, so maybe that won't work. But here's a more rational idea: what about putting your cookie sheet (or other metal heat-enduring surface) on top of your grill and then closing the lid, essentially using your BBQ like an outdoor oven. Does that work? Has anyone tried that?

    DSC_0245

    Anyway, these cookies here, these Maple-Pecan Shortbread don't exactly seem like a super summery cookie (more of an autumnal one, in my opinion, what with the maple and the pecans and the everything), but I made them for both a summer picnic, as well as a 4th of July BBQ at my brother and sister-in-law's house, and they were a hit at both events. These cookies are really good. Surprisingly so. In fact, they might have been even more of a hit at the 4th of July BBQ since by then they were a day old, and these guys improve with age FOR SURE.

    008_18

    So you got ya dough, which has ground up pecans in it as well as a hefty amount of maple syrup, and after the baked cookies have sat around for a day, the maple flavor really deepens. Actually, the recipe also calls for Maple Extract, which I couldn't find anywhere so I omitted it--and no problem! The cookies were still extremely mapley, but I bet they would be really incredible if you have maple extract on hand as well.

    Lastly, because you roll out the dough and cut it with a cookie cutter, and then decorate each cookie with a pecan half and some turbinado sugar, you WITHOUT A DOUBT produce a beautiful set of cookies. You can't really screw up the look of these, unless you don't know how to use a cookie cutter (and if that's your situation, you probably shouldn't be reading my blog, juss sayin'). So, they are perfect to bring to a party if you want to impress people but not do anything too elaborate. Simplicity is highly underrated in baking!

    And very very lastly, if you are just crazy enough to try either of my BBQ cookie ideas--LET ME KNOW SO WE CAN BE FRIENDS FOREVER!! If you send pictures, I will love you even more/think you are even crazier/admire you a lot. And even if you bake these in the normal way, I will admire you for enduring the oppressive heat of your kitchen in the name of tastiness!

    P.S. AWSHIT this is genius!!

    DSC_0251

    P.P.S. Sorry for the lack of photos! I was too busy eating cookie dough/pecans to grab my camera during the baking process -_-

    Maple-Pecan Shortbread
    Makes about 2 dozen

    Ingredients

  • 2 1/4 cups all-purpose flour, plus more for work surface
  • 1/2 cup cake flour (not self-rising)
  • 1/2 teaspoon salt
  • 3/4 cup pecan halves (about 2 1/4 ounces), finely chopped
  • 1 cup (2 sticks) unsalted butter, room temperature
  • 3/4 cup granulated sugar
  • 1/4 cup pure maple syrup
  • 1 large egg yolk
  • 1/4 teaspoon pure maple extract
  • 1 large egg, lightly beaten
  • Turbinado sugar, for sprinkling

  • Directions

  • Into a medium bowl, sift flours and salt. Whisk in 1/2 cup chopped pecans, set aside.
  • In the bowl of an electric mixer fitted with the paddle attachment, cream butter and granulated sugar on medium-high speed until smooth and light, about one minute. Add the maple syrup, egg yolk, and extract; beat on medium speed until well combined. On low speed, gradually add flour mixture, beating until just combined. Dough should be smooth and pliable. Flatten into a disk. Wrap in plastic; chill until firm, 1 1/2 hours or overnight.
  • Preheat oven to 350 degrees. Line baking sheet with parchment paper.
  • On a lightly floured work surface, roll out dough to 1/4 inch thick. Cut out rounds using a two-inch cookie cutter; place one inch apart on prepared baking sheet. Brush tops with beaten egg; sprinkle centers with remaining 1/4 cup pecans. Sprinkle the entire surface with turbinado sugar.
  • Bake cookies, rotating baking sheet halfway through, until golden around the edges, 10 to 12 minutes. Transfer to a wire rack to cool. Store in airtight containers at room temperature up to four days.


  • ****
    {End Results}
    Baking Difficultly: 2/5
    Ingredient Accessibility: 2/5 (Maple extract, where y'at?!)
    Tastiness: 4.5/5
    Attractiveness: 4/5
    Is it worth it?: Hell yeah! Worth firing up the ol' oven in July...maybe...

    {Pairings}
    Drink: I'd wash these guys down with some iced tea, perhaps with a sprig or two of sage thrown in? (That's how my ma makes hers, and it's da bomb diggity!)