Friday, April 24, 2015

[Cookie 106] Apple-Cherry Crumble Bars


Ok, so let's talk about crumbles.  Actually, before we talk about that, let's get some clarifications out of the way.  A crumble is not a cobbler, which is not a crisp either.  Now, they're all damn good, that's for sure, and they all have fruit underneath some kind of pastry topping, but that's where the similarities end.  And up until right now, I never couldn't differentiate them for the life of me.  I knew that I likes the ones that had a streusel-like topping, but you know, WORDS, definitions, names--screw em!  I could never remember which was which.  So here's the low-down:

Cobblers have a biscuit topping.  Not so into those, to be honest.  I mean, if you put one in front of me, I'm not going to NOT eat it, but if I have a choice, I'm going the crunchier, crumblier route.  Apparently cobblers can also be made with a cake batter or cookie dough crust, but that just sounds fucked up to me.  Again, I would eat it if you presented it to me, but I'd be skeptical.  Why combine so many delicious desserts?? I want one of everything, separately.

Crumbles are very similar to crisps.  They both got that baller streusel-ish topping, which is clearly better than a biscuit topping, I mean come on.  But there is a finer difference between these two.  CRISPS GOT THEM OATS IN EM! And that, my friends, is the clincher, for me at least.  I'm a crunchy, hippie-dippy type, so anything with whole grains and some toothiness to it will always get my vote.  


Now, I got all these great details from this informative post on the Kitchn, so of course I'm not liable if they're incorrect and lose you a trivia contest.  But it makes sense to me.  Oats are crispy! And guess what? This recipe has oats in it, but they call it an Apple-Cherry Crumble Bar! Better reevaluate, Martha!


Regardless, these are pretty bomb, especially if you're into crisps, crumbles, or even cobblers.  The nicest part is the filling though.  It's a combination of dried apples and cherries simmered in apple cider.  Pretty perfect for an blustery autumn day, which is why I am writing about it in April (hey, this one goes out to you, southern-hemispherers!)

The recipe is easy, hearty, and tasty.  No promises though on how tasty, since I made it about a year and a half ago and I have a really shitty memory.  Sorry! I don't have any horrible memories of throwing up after eating it, so there's that.  I've reread the recipe and baked it all again in my mind, and it tastes mentally delicious.  So go for it! Git bakin' :)


Apple-Cherry Crumble Bars
Makes 2 dozen

Ingredients

  • 3 cups dried apples, about 7 ounces
  • 3/4 cup dried cherries, about 4 1/2 ounces
  • 1 3/4 cups apple cider
  • 3/4 cup plus 2 tablespoons packed light-brown sugar
  • 1 teaspoon ground cinnamon
  • 2 cups rolled oats
  • 1 1/2 cups all-purpose flour
  • 1/2 teaspoon baking soda
  • 1/2 teaspoon salt
  • 2 sticks (16 tablespoons) cold unsalted butter, cut into small pieces, plus more for dish

Directions

  1. Preheat oven to 375 degrees. Butter a 9-by-13-inch baking dish. Simmer apples, cherries, and cider in a covered saucepan, stirring occasionally, until fruits are softened and plump, about 5 minutes. Drain, reserving 2 tablespoons liquid. Let cool.
  2. Coarsely chop fruit. Combine with 2 tablespoons sugar, 1/4 teaspoon cinnamon, and reserved cooking liquid.
  3. Whisk together oats, flour, baking soda, salt, remaining 3/4 cup sugar, and remaining 3/4 teaspoon cinnamon in a large bowl. Cut in butter with a pastry blender or 2 knives until crumbs range in size from peas to gum balls. Press 4 cups of oat mixture into bottom of prepared dish. Spread fruit filling on top, leaving a 1/4-inch border on all sides. Sprinkle remaining oat mixture on top.
  4. Bake until golden brown, about 35 minutes. Let cool in dish on a wire rack. Cut into 24 bars. Bars can be stored in an airtight container for up to 3 days.
****

{End Results}
Baking Difficulty: 2/5
Ingredient Accessibility: 3/5 (If you can't find dried cherries, try cranberries; if you can't find dried apples, don't make these!)
Tastiness: 4/5
Attractiveness: 1/5 (When has a crumble ever been beautiful?)
Is it worth it?: Ya

{Pairings}
Drink: Hot toddy would be nice
Activity: Crumble some crisps for your local cobbler

Friday, April 17, 2015

[Cookie 105] Vanilla-Bean Spritz Wreaths


I'm going to blow your mind right now.

Ready?

THIS IS MY SECOND POST IN 2 HOURS! After nearly a year and a half of NOTHING! I go zero to a hundred! Can someone give me an award? Something like an Oscar, something extremely self-congratulatory and undeserved.  Yeah, thanks!

And get this, I'm actually going to do a post.  About a cookie.  That I baked a year and a half ago.  Ha.  Let's see how this goes.


Let me preface this by explaining why I have the sudden urge to get back on my cookie soap box and blather on about cookies to an audience of probably 0 readers.  Well, every so often I come back to this blog and read through old posts.  Ya know, just to shine up my ol' ego and inflate my head a little about how funny, charming, smart, and all around fantastic I am.  And then I get this sudden urge to start the blog up again and, DARE I SAY IT, finish the quest.  Well, tonight was one of those nights.  And here I am, blogging like the lazy egomaniac that I am.


Actually, if you look back to my last legit cookie post, you'll see I had the same idea as I do now.  And I actually baked up 2 more recipes after those Pecan Logs, and never posted them.  Why? Because my excitement to blog revved up and died in the time it takes to write exactly one blog post, and then I got bored.  But you know, I'm going to try to do this again.  I know.  Empty promises.  I don't expect a single one of you to believe me, or care. But if you are still crazy enough to follow this blog, let me dedicate this cookie to you.


Don't be offended that it's not a fantastic cookie that I'm dedicating to you though.  Sorry! Don't blame me bish, I didn't write The Book! But it's an expensive cookie, so there's that.  It calls for real deal vanilla beans and the name for the cookie comes from the German word "spritzen" which means "to squirt"--if that's not a compliment, I don't know what is! Take what you can get.


So let's get down to business.  From what I can remember, these cookies were simple to make and tasted like a nice vanilla shortbread with a hint of cinnamon.  I would have baked them sooner, but put it off thinking I would one day actually buy a cookie press like the recipe requests.  But then I remembered who I am, and what my bank account looks like, I accepted the fact that that was a reality I was never going to face.  So I just rolled out the dough and used a cookie cutter, LIKE A NORMAL PERSON.  But I used a tooth-shaped cookie cutter, not like a normal person.  I love this cookie cutter, but baking a shortbread with cinnamon and vanilla bean flecks into the shape of a tooth isn't really a great food styling choice.  Rotten teeth anyone?

Sorry, I'm really not sellin' this one, am I? To be honest, it was sort of a let down.  I was expecting a super vanilla-y flavor, what with the 2 whole vanilla beans that cost an arm and a leg, but it ended up just tasting like a plain shortbread.  Like, if you asked me to try it blindfolded, I'd assume there was maybe a teaspoon of vanilla extract in it, but that's it.  Not worth the $10 for the whole beans!

$10 worth of vanilla beans, like what?!

In conclusion, these cookies are ok but sorta lie on the "who cares" side of things.  Maybe if I had a fancy cookie press I could make them into the shape of that Oscar trophy I deserve, and then they would also taste better (because victory is sweet, get it??).

I got one more cookie to post, which I baked a year and a half ago, and then I have to actually crack open The Book and make some more.  Aren't you excited we are on this ancient, forgotten adventure again? I know I am! xoxo


Vanilla-Bean Spritz Wreaths
Makes about 5 dozen

Ingredients

  • 3 1/2 cups all-purpose flour
  • 1 teaspoon salt
  • 3 teaspoons ground cinnamon
  • 2 vanilla beans, halved lengthwise, seeds scraped and reserved
  • 1 cup plus 4 teaspoons sugar
  • 3 sticks unsalted butter, room temperature
  • 2 large egg yolks

Directions

  1. Preheat oven to 350 degrees. Whisk together flour, salt, and 1 teaspoon cinnamon.
  2. Beat vanilla seeds and 1 cup sugar with a mixer on medium speed until incorporated, about 3 minutes (sugar will clump together slightly). Add butter, and beat until pale and fluffy. Add egg yolks, 1 at a time, beating well after each addition. Reduce speed to low. Add flour mixture, and beat just until smooth.
  3. Divide dough into 3 portions. Pack 1 portion into a cookie press fitted with wreath disk (cover remaining portions with an inverted bowl or refrigerate in an airtight container for up to 3 days; bring to room temperature before using), and press shapes about 2 inches apart onto baking sheets. Bake until edges are just golden, 9 to 12 minutes.
  4. Meanwhile, combine remaining 2 teaspoons cinnamon with remaining 4 teaspoons sugar. Sprinkle over hot cookies. Let cool on sheets on wire racks. Repeat. Cookies can be stored in a single layer in airtight containers up to 4 days.

****
{End Results}
Baking Difficulty: 1/5
Ingredient Accessibility: 2/5 (because of the spency vanilla beans and the stupid cookie press)
Tastiness: 3/5
Attractiveness: 3/5
Is it worth it?: Meh

{Pairings}
Drink: Milk, cuz them teeth look like they need it
Activity: Call 1-800-Dentist, today!


Return of the dead

Follow my blog with Bloglovin

Oh hi.

This blog is pretty dead, but you never know! I could make a comeback!! I've been saying this for like, 3 years.  And I've made one or two feeble, brief, sad comebacks.  Right now I'm just trying to figure out how Bloglovin works, so I can see what the kids are up to these days.  Then I'll go back to the rock I'm hiding under.

But ya know, I've been busy lately! Not baking cookies, unfortunately, but working on my photography portfolio, becoming a freelance web designer/developer, and working in my studio.  So check those out, if you're interested.

And if you're really obsessed with me, follow my Instagram accounts.  Yes, that's plural.  I have a disturbing number of accounts.  Here's a quick breakdown:

@ee.photo - My lifestyle photography account! This one has the prettiest pictures.
@fantasylawyer - My art account, where I post the artwork and artists that I'm inspired by (you can also follow me on here and here)
@zziee - My personal one (probably the weirdest and least accessible, but all are welcome!)
@donutdatabase - My attempt to document all the sleezy strip mall donut shops in Los Angeles!

Ok, that's the end of my personal plug.  Maybe one day I'll crack open THE BOOK (not the bible, fyi) and bake those crazy Chocolate-Pistachio cookies...

Until then, xoxo
Lizzie

Wednesday, October 30, 2013

[Cookie 104] Pecan Logs


Yeah I know, you probably thought it was all empty promises.  That I really wasn't going to start up this blog again, and I know this has been keeping you up at night (for me, it's been my awful upstairs neighbors--like, why are you moving/building/destroying furniture at 2am?!).  But don't even worry about it--I am so here, for you, for real! And my excuse for not posting promptly isn't laziness this time (or not exclusively laziness, I should say).  I've just been working on retouching the photos to make them look real nice and purty for you.  So what I'm saying is, it's all going to be better than ever! First step on the road to improvement--these Pecan Logs, in that they are better than those lame Icebox Spirals and Bull's-Eyes of the last post.  One step at a time.  The next cookie is even better than these, so get pumped!


But some things haven't changed.  I still primarily chose to make these cookies because they didn't require an extra trip to the grocery store, since I still had pecans left over from making this totally insanely incredible Pecan-Pumpkin Pie with Bourbon Whipped Cream.  I don't really have a recipe to link to that, since it was a combination of several recipes, and a lot of people were involved and a lot of drinking was involved, so I'm not even sure everything that went into it.  But it was good!!! Just imagine--bottom layer pumpkin pie, top layer pecan pie.  They actually ended up totally mixing together, as a result of poor judgement and drinking the bourbon instead of cooking with it, but seriously who gives a shit.  It was goooooood!!!

Sorry about the tangent, but I mean come on, pie, pie pie, piepiepie.  Maybe I should make a pie blog next.  I don't know if my arteries, stomach, or wallet could really handle that though, to be honest.  OK OK OK, cookies, let's talk.


These are real classic shortbread cookies with pecans both on the inside and the outside.  I was worried that they hadn't fully baked through, since for some reason I always have that issue when making shortbread.  But after letting these cool and waiting a few hours, they hardened up and really lived up to their category of "crumbly and sandy".


One thing I'd like to mention (which Martha already did in in the header notes, and I totally ignored): Try not to over grind the pecans.  They very quickly release their oils and then clump together and don't really integrate into the dough that well, and definitely are difficult to roll onto the outside of the dough.  I was about 2 microseconds away from total pecan butter--not that that would have been a bad thing, but it would have botched this recipe for sure.


They're cute though, huh! All lined up like little poops.  Sorry! Another note: the dough is a little tricky to roll into an even log shape, especially if it warms up.  The less you handle the dough the better.  I rolled it into a ball and then a quick roll between my palms to make the log shape.  Then dump it into the pecans and roll it about.  Side note: I once went to a very very real Chinese food restaurant that served a dessert that they called "Ass Rolls About."  It had something to do with a donkey rolling in the dust or something, but I mean come on, really? I was about to do a quick google search on Ass Rolls About, but then remembered I'm at work, and that might not be a smart choice.


And voila.  They are cute and taste nice.  Very good for a cookie exchange between friends, since those are coming up.  Also good for a cookie exchange between your hand and your mouth (sorry, is that a double entendre?).  They're good.  Nothing other worldly, but good, cute, and simple--JUST LIKE ME.  (Ok, only the last of those 3 things is actually true...)


Pecan Logs
Makes about 4 dozen

Ingredients

  • 2 cups pecans (about 5 1/4 ounces), toasted
  • 2 1/2 cups all-purpose flour
  • 1/2 teaspoon baking powder
  • 1 1/2 teaspoons coarse salt
  • 1 cup (2 sticks) unsalted butter, softened
  • 1 1/4 cups confectioners' sugar, sifted, plus more for dusting
  • 1 large egg
  • 2 teaspoons pure vanilla extract

Directions

  1. Preheat oven to 350 degrees. Process pecans in a food processor until finely ground; set aside.
  2. Whisk flour, baking powder, and salt in a medium bowl; set aside. Put butter and confectioners sugar in the bowl of an electric mixer fitted with the paddle attachment; mix on medium speed until pale and fluffy, about 2 minutes. Add egg and vanilla; mix until well combined. Reduce speed to low. Add flour mixture and half of the ground pecans; mix until just combined. Wrap dough in plastic; refrigerate until cold, about 30 minutes.
  3. Roll tablespoons of dough into 2-inch-long logs. Roll logs in remaining pecans. Place on baking sheets lined with parchment paper, spacing about 1 inch apart.
  4. Bake cookies, rotating sheets halfway through, until pale golden and slightly cracked, 14 to 15 minutes. Transfer logs to wire racks to cool, about 5 minutes. Sift confectioners' sugar over cookies before serving, if desired. Cookies can be stored in airtight containers at room temperature up to 3 days.

****
{End Results}
Baking Difficulty: 1/5
Ingredient Accessibility: 4/5
Tastiness: 4/5
Attractiveness: 4/5
Is it worth it?: Sure

{Pairings}
Drink: Bourbon.  But seriously, they are the perfect size for dipping, so maybe milk? OMG CHOCOLATE MILKSHAKE WOULD BE KILLER!!!!
Activity: Rolling your ass about

Saturday, October 5, 2013

[Cookie 103] Icebox Spirals and Bull's-Eyes


God this feels so WEEEEIRD!!!!!!! I can't believe I'm doing this again.  What's wrong with me?! Everything has changed since I left the blogging world.  Google Reader doesn't even exist anymore, so how will people even know about this blog? Actually, if there's anyone out there reading this, would you mind giving me some insight into how people/you read blogs these days? Like, how are you reading this right now? I know all about Pinterest and Instagram (follow meee), but what about BLOGSSSSS?? Are they, like, so 2010? Help!

Okay, so let's get to know each other again, yeah? Since I last posted, I have graduated college, moved into a really awesome apartment, traveled around India for 4 months, been using a laptop with a non-functioning period key for nearly a year, and finally got a legit job at a photo company.  This is the lady who is writing to you:


And here are some nice things she has in her apartment (Baryshnikov and Dahlias, both are sexy):


She has NOT been baking very much, that's for damn sure.  Until now--I am so ready to do this.  I hate the fact that my triumphant return is marked by such a pathetic, boring, lame cookie, but hey, I'm still the same girl who wants to bake cookies without having to go food shopping for any ingredients other than sugar and butter.  So I made these guys.  But don't worry--I've pretty much exhausted all the really boring recipes from the book, so now I have no choice but to buy expensive, weird ingredients and bake difficult, tedious recipes!


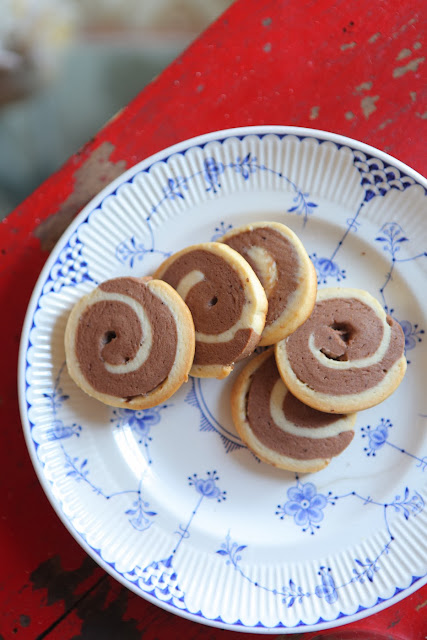
Anyways, let's get to it.  This is a total standard icebox cookie recipe, so you can make the dough and keep it in the freezer for a century and bake a random cookie here and there when you feel like it.  The only way I can see Martha justifying including this boring recipe in her book is because she made fucking spirals with the dough, but seriously Martha, we all know you're really good at making boring shit look pretty.  Come on! A little flavor would have been nice.  Also, these were totally NOT crumbly and sandy! That may have been my fault, but still, I'm upset.


So I tried to spice it up by using Droste cocoa and this fancy vanilla extract, but it really didn't make much of a difference.

And I didn't even TRY to make the bull's-eyes, because those look so LAME!!!! Like, who cares about those guys when you've got spirals around.


In summation, this recipe is in no way remotely worth the effort of rolling the dough into a pretty spiral log.  The cookie is nice only if you've just discovered that you had already made the dough several years ago and it's been sleeping in your freezer collecting freezer burn and now you can have surprise cookies! I would not bake them if you want cookies right now--maybe bake them in preparation for nuclear apocalypse? Otherwise, choose from any of the other delicious, simple, fast recipes in the book.


Icebox Spirals and Bull's-Eyes
Makes 34 bull's-eyes and 28 spirals

Ingredients


  • 1 1/2 cups (3 sticks) butter
  • 1 3/4 cups sugar
  • 1 teaspoon salt
  • 2 eggs, plus an extra egg white for "glue"
  • 3 teaspoons pure vanilla extract
  • 5 cups flour, plus more for work surface
  • 2/3 cup milk
  • 1/4 cup cocoa powder

Directions
    1. Using the electric mixer, mix the butter and the sugar until creamy. Add the eggs and the salt, and mix well. Beat in milk and vanilla. Add flour a little at a time, mixing it in until all of it has been incorporated.
    2. Divide the dough into balls, one for each color. For chocolate dough, add cocoa (1/4 cup is enough to flavor half a batch). Mix well with electric mixer. For colored dough, start with 1/4 teaspoon food coloring, and mix well. Add more in tiny amounts for darker colors. Gel-paste coloring can be intense, so add it gradually.
    3. Wrap each ball of dough in its own sheet of plastic wrap; pat flat into a rectangle. Refrigerate at least one hour or until ready to use.
    4. Parchment or waxed paper makes a good work surface. Sprinkle generously with flour, then roll out each piece of dough 1/4 to 1/2 inch thick to make the swirls; you can use thicker layers for the bull's-eyes.
    5. The bench scraper is a good tool for trimming dough's edges to make them even. The egg white, brushed on with a pastry brush, will act as a glue, making the layers stick together.
    6. For center, with your hands, roll chocolate dough into a 1/2- to 1 1/2- inch-thick rod; chill 20 minutes. Place rod on edge of rolled-out dough that's been brushed with egg white.
    7. Roll rod inside sheet of dough. Cut the dough where it meets up. Seal by pinching and pressing gently. Chill 20 minutes, then repeat to add other layers. To decorate, go to step 7, or jump to step 8 for plain.
    8. For spirals, measure and trim two or more colors of dough to same size. Brush on egg white, then stack layers. Brush top with egg white. Starting at one end, roll up the dough.
    9. Smooth and straighten the layers as you roll them so there are no gaps, then gently pinch and press the edge of the roll to seal it. Now the dough is ready to decorate. If you want plain cookies, skip to step 18.
    10. Add your favorite toppings (try coconut, colored sanding sugar, chopped nuts, or chocolate sprinkles): Spread topping in baking sheet, brush dough with egg white, and roll the log in topping.
    11. Roll each log in parchment or waxed paper; twist the ends of the paper closed. To help the logs keep their round shape, set each in a cardboard paper-towel roll that you have sliced open lengthwise.
    12. To remember what colors you have already used, with crayons, draw the designs onto key tags; tie the tags onto the paper covering the logs. Chill logs until they are solid, about 1 1/2 hours.
    13. Cut 15 inches of dental floss (or double thickness of thread). Let log soften for about 10 minutes. Remove parchment. Wrap floss around log and pull through. Make the slices thin: 1/4 inch or less.
    14. Preheat oven to 350 degrees. Place slices on an ungreased baking sheet (lined with parchment paper). A grown-up should bake the cookies 12 to 15 minutes, until firm but not browned. Let cool on baking sheet for several minutes, then transfer to a wire rack.
****
{End Results}
Baking Difficulty: 2/5
Ingredient Accessibility: 5/5
Tastiness: 2/5
Attractiveness: 3/5
Is it worth it?: Nah

{Pairings}
Drink: Margarita
Activity: Celebrating my return with listening to the above song